Step 4 Location
In this section you must provide location information for each site where research will be undertaken. The map provided allows you to select one or more research locations. Click save for each individual location in which you intend to conduct research before adding a new location. At the end of the process a set of locations will be listed that you can edit before submission.
This is one of the more complex areas of the system. It is intended to make life easier for you and for the authorities. However, a degree of experimentation and patience is likely to be required to become familiar with how to enter locations.
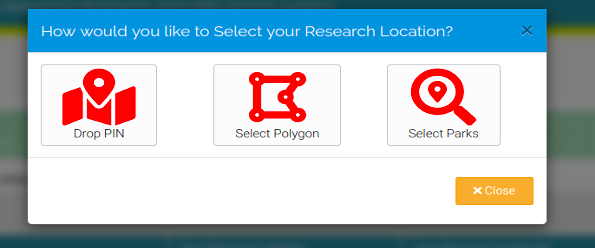
To add locations, first click the ‘Add Location’ button in blue. A window will pop-up, allowing you to insert the location details for your research in the three following ways:
- Dropping a Pin
- Drawing a Polygon
- Selecting National Parks
Please note that the location selector is powered by Google Maps. Sometimes Google Maps may become unresponsive. It is quite rare, but please be patient and retry where necessary. If you encounter persistent problems please raise an issue under Need Help?.
You can download a detailed step by step guide to adding locations as a .pdf from here
4.0.1 Adding Locations
Selecting a location
Dropping a pin: Through this method you can search the name of the location in which you wish to conduct research.
In the top left of the map screen enter a place in “Search Location Name.” The system will lookup the term and if accurate select one. Then press Geocode. A pin will drop on the location.
If that is the location you want press Save. Now repeat the process and Save.
If the system does not recognise a place name you can optionally enter a name and coordinates manually and then press Save.
When complete press Close and the names of each location will appear underneath the question. You can optionally edit the locations and coordinates or delete them and start again.
Selecting a Polygon: When you select this option, you will see three small icons at the top of the map, the hand, the polygon and the rectangle. Use the hand icon to drag the map, you can also zoom as necessary. Click the polygon icon to draw a polygon. When you are ready to draw a polygon, click once on the map, and release the mouse (do not attempt to drag) and your first polygon point will appear. Continue this step as many times as necessary, adding lines to the polygon. Ensure you click save otherwise your polygon co-ordinates will not be recorded. The system can only save one polygon at a time so ensure you click save. For good measure it is best to ensure you exit the pop-up and check that the record has been saved before proceeding with your next polygon.
Selecting Parks: This is presently not used in the system and will become operational at a future date. Please use the Drop Pin option to locate parks in the meantime.
4.0.2 Ex-Situ Collections
Provide the name and location of any ex-situ collection where material will be stored (such as a Museum or GenBank etc).
4.0.3 Land Based Stations
You must also provide the location of any field-stations which might be needed, and the number of full-time and part time staff expected to staff these locations.